Friday, April 15, 2011

The nursery is retextured!

Its hard to believe, but baby #5 is on the way and this is the first time we will have a dedicated nursery! The three big boys all share one (large) room upstairs and our toddler and the new baby will be sharing the nursery. It is so nice to have a place for changing diapers and age appropriate toys, not to mention a convenient place to store baby clothes. Most of our children's hand-me-down/future size clothing is stored in totes under the basement storage shelves, but baby clothes get changed out so frequently, I could spend all my time bring totes up and down the stairs to keep up with a growing infant! Having them in the nursery will simplify things.

You might wonder why I would be so set on redecorating the nursery this late in my pregnancy... well....
We painted the nursery walls with a pale yellow (a can of "oops" paint), after we hung new sheet rock on the ceiling last summer, but I have been so bothered by the patch job on some of the walls (done by the previous owners) that I just HAD to redo it before I could allow Mr. Ireland to put trim up. It bothers me that much! I figured that it was easier to displace one child for two nights now, than to wait until there were 2 little ones who had to be moved out and worked around.


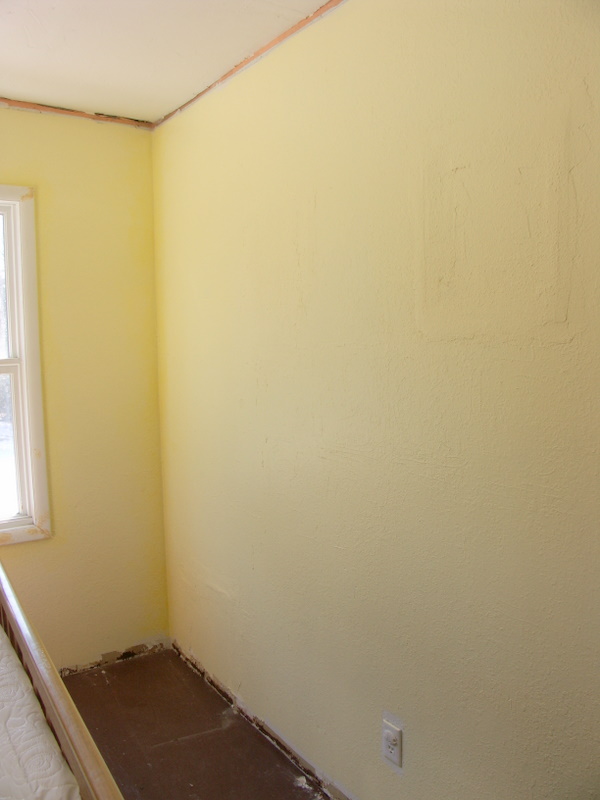
See that square in the upper right portion of the wall? There are 3 of those around the room and squares of glue (not visible to you) everywhere, I'm assuming from having large tiles glued to the walls? Maybe panelling? Whatever, it's irritating.

Here are some nursery befores:


I retextured the walls over 2 days, mixing my new paint into the mud to make the walls a darker, more golden yellow. It took me about 5 hours to do hand texture 4 walls. Its not perfect (I have never mixed paint into my texture before and it was not predictable) but I love the new color and the aged look of the walls now. It fits the house much better.

There are many small things left to be done in the nursery: sew new curtains (from giraffe print bed sheets bought on clearance), add a shelf above the dresser, make a red slip cover for the chair, add shelves in the closer (cut and ready to go), install the closet doors (waiting in the basement), paint the dresser that I use for a changing table (and replace drawer glides and hardware), and hang art work. It's not a difficult makeover, but those little projects can be time consuming.

I was able to get the paint for the dresser and 4 bags of mud for the bedroom all on clearance this week! It came to a whopping total of $25 for all of it (which is saying a lot when the original total would have been close to $80)! I bought the VOC free paint for the walls back in January when it was on clearance, marked down to $10 a gallon from $32 and was able to choose my colors. The laminated shelves for the closet were not on sale, but I made sure I had them cut before I left the store, so that saves me a lot of work at home.

Here is my swatch palette:

Curtain fabric, accent and dresser color, current rug and flooring, new walls!


If I have time, I will make a crib skirt and bumper from the giraffe print. We'll see. My sewing list gets longer and longer and my due date seems to be racing at me! I should have new pictures up next week, so check back soon!

Saturday, April 9, 2011

In like a lamb, out like a....

Well I would say "lion" but I'm not so sure our progress here has mirrored that idiom. We did start March off slowly, working on little projects (yay office!) and now we are ramping up to bigger and bigger things! I would like to say that I'm not in full prebaby panic, but the fact that we are taking this week off school so I can organize the house says otherwise. The last of the boxes are nearly unpacked and I will be able to focus completely on the nursery.

I'm going to keep it simple and just post pictures of March's projects. Enjoy!

*Disclaimer: These pictures have not been staged. I live in this house with 5 male occupants and consequently, my house will never look like a show room. So expect to see stuff! :) *


Preparing to put the last 2 sets of shelves up in the basement; After the shelves are in and randomly stuffed with our junk. At least its up off the floor....mostly. Thanks, Mr. Ireland, for moving all that stuff!


Our new (craigslist) dining room chairs, waiting for the new table. The old table and benches were moved up to the homeschool area (finally!); Mr. Ireland building said table (love him for taking on a project that I was supposed to do myself); New table! Seats 10! We will bring it outside again this summer and I will sand and stain it. We are still looking for 4 more chairs, by the way.


Gorgeous new cabinet that was given to us! We moved our silverware and most of my canning and other random utensils into the drawers. I LOVE the retro look of it too! ; Unpacked all the frequently used cookbooks to the cupboard above the stove. These two changes allowed me to get rid of the stack of boxes in my kitchen (and prevent the toddler from destroying more books or dishes!)


My seedling trays - each carton is full of egg shells that have been cracked in the upper 1/3 and set back in the tray empty. Free seedling pots!; My crazy green house contraption in our living room. Started tomatoes and celery first (celery is in the shells) .


Dining room curtains (thrift store find!) before being dyed; Dining room curtains after being dyed. The color is not quite as I had imagined it, but Mr. Ireland likes them, so they will stay. I had a difficult time choosing between tan or green. *Shrug* They're OK.

As I said, I did get some work done in my office. New shelves went in, lots of organizing, but I recently cleared the upstairs hallway of all its boxes, which were "redistributed" to the basement and... my office!

April has been very busy so far. We have tackled a big project every Sunday. There will be many more pictures to share. The nursery is our last big project and I have the room prepped and my materials ready to begin work this very afternoon! I plan on sitting back to relax after this weekend, before baby #5 arrives (in about 5 weeks) and working on the mountain of sewing in my office. Wish me luck!

Sunday, April 3, 2011

Soda bread the way it should be....

Things have been pretty busy around Ireland Manor! We have stocked up on paint for the summer (it was all on sale!) and all our basement shelves are built. We even found time to clean the master bedroom and made room for a bassinet for the new baby (due in 7 weeks!). While you wait for pictures and postings of our recent projects and progress, I thought I'd share one of my favorite recipes with you.

If Americans know anything about Irish cuisine (and they don't) its that every meal (which must be corned beef and cabbage, right?) is accompanied by soda bread. You know, white, sweet, raisin or caraway seed speckled bread. But I don't call that soda bread. That is tea bread. Really, its nothing more than a giant scone! If you want something to serve with jam and tea, you can't go wrong with a tea bread or a scone. But if you want something to go along with your meat and potatoes, lamb stew or to make grilled Kerrygold cheese sandwiches, you want something closer to bread. Well look no further!

This is my all time favorite TRUE soda bread - mixed in one bowl, using soda, tartar and buttermilk for leavening and using a combination of fine and coarse flours. Its darker, its not as sweet as other soda breads and there is nothing better than a hunk of it with a slice of cheese and a pint of porter.

This recipe is being reprinted WITHOUT permission. It can be found in the excellent cookbook The Irish Heritage Cookbook, written by Margaret M. Johnson. Each recipe is accompanied with some historic or local background, making this cookbook an essential in any Irish American cook's kitchen. I have added my comments in parenthesis:

Mills Inn Brown Soda Bread


2 cups coarse whole-wheat flour or 1 cup each wheat bran and old-fashioned oatmeal (If you'd like to try something even more authentic, try this flour from King Arthur Flours.
2 cups all-purpose flour
1/2 teaspoon salt
1 teaspoon baking soda
1/2 teaspoon cream of tartar (who knew you could use it for something other than meringues!)
1/4 cup sugar
4 tablespoons cold butter (closer to room temp if you will be using my mixing method)
2 cups buttermilk

Preheat oven to 400 F. Lightly grease a 9 inch round cake pan (olive oil works great).

In a large bowl, stir the flours or wheat bran and oatmeal, salt, baking soda, cream of tartar and sugar together. With a pastry cutter, 2 knives or your fingers (this is the method I use, though you could do this part in a food processor), cut or work the butter into the dry ingredients to the texture of coarse crumbs. Make a well in the center and add the buttermilk. With a wooden spoon (or your hand), mix until a soft dough is formed (I mix this together using the flip method: scoop under the flour and flip it over, rotating the bowl as you go to incorporate the milk and flour).

(If you have mixed the dough with your hand, keep flipping dough until it forms a cohesive, smooth ball, kneading gently. Stop when the dough sticks together and comes clean away from all sides of the bowl. Transfer dough ball to the prepared tin or cake pan.)
Turn the dough out onto a floured board and knead lightly, just enough to form a large ball. Flour your hands if necessary for easier handling. (We just skipped this.)
Flatten slightly. With a sharp knife, make a cross on the top. (Do not cut down into your dough too far making your cross, only about 1/4-1/2 an inch.)
Place the dough in the prepared pan (done earlier) and bake until the bread is lightly browned and sounds hollow when tapped, 35 to 40 minutes.

Now, go eat it!